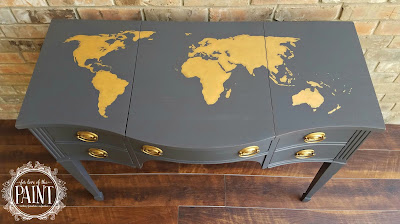
Talk about fabulous! I am so beyond excited about the final look on this beauty, and because I love y'all, I even broke it down step by step for a full tutorial. Click below to keep reading!
Once I was pretty sure that the sizing would work, I put this one off to the side and got distracted by at least a half dozen other projects (and that's a conservative estimate) for probably a good six months. I recommend skipping this step. ;)
When I was ready to go again on this project, I painted all over, including under the lift - top lid, with General Finishes Queenstown Gray milk paint and very lightly distressed the edges. I chose this because the self-leveling properties help me achieve that gorgeous smooth finish, as well as due to its durability. Then the moment of truth. I laid out the outline again, and began the map.
Do you remember in like 3rd grade when you'd shade on the back of paper with a pencil, then outline the other side of the page to transfer the graphite? It was SUPER hard to see because the graphite didn't stand out a lot from the gray, but you could see the shiny reflection in the right light. I worked with a small detail brush, walking around the desk so that I could approach the lines with the paint, pushing it right up to the edges AWAY from me. (This is important, particularly with the initial outline: if I paint where the outline edge is toward me, I lose much of my visibility and control.)
The Modern Masters Matte Metallic Gold Rush is a semi-opaque product. That means 3 coats for full coverage (possibly more when you're going over a highly contrasting color). The first two I painted with my detail brush, and you can see the difference here where I have a single coat on South America and two coats on North America. However, there was still some translucency and I could see brush lines when looking from certain angles.
So I pulled out a craft sponge.
When I am seeing brush strokes, I like to vary my approach. Otherwise I feel like the lines continue to settle onto and over one another, and either don't resolve what I'm seeing, or can even compound the issue. This sponge has a smaller end that I used near the edges, and a larger circle that I used in the centers. You can see how much more coverage I had toward the western side of Africa in this photo. The sponge stippling helped me to achieve a much more opaque finish that texturally appears more like a gold leaf.
I sealed with three coats of High Performance Water Based Top Coat for protection, and used a gold leaf Rub N Buff to lightly accent the hardware.
I hope you love the final product as much as I do!! It's the perfect size for a writing desk, or would be just stunning paired with a gold mirror as a vanity.
The real beauty is that this technique can be applied to any silhouette design! I hope that if you try it out, you will share your pieces with me! Please take photos, I'd absolutely love to see them! And tell me, what other designs would you LOVE to see??


I love this! This is exactly what should be done with the desk I just got. I was going to re-do the top and just didn't know how or what to do. Thank you so much for sharing!
ReplyDeleteThanks, Carmen!! I'd love to see a photo of your desk once you've completed it!
DeleteIts really cool and tons of glamour
DeleteCongress Congratulations
Mi piace tanto.
ReplyDeleteI love it!
Bye bye from Italy
Pls contact me if you ever get another mahogany Drexel vanity like this. Smlenane@gmail.com
ReplyDeleteA few Clients likewise determine both Desk and Composing Table/Library Table for their office.
ReplyDeleteergodesks.co